

Drawing a rose can feel intimidating at first, but once you break it down into simple shapes and layers, it becomes an exciting and rewarding project. Whether you are an older student or an adult looking to refine your skills, here are 10 uncomplicated steps on how to draw a rose for intermediate artists that will guide you through creating a stunning, realistic rose step-by-step.
Materials You Will Need
You can follow along with any supplies you have, but for best results, the artist in the video used:
- Prismacolor colored pencils
- Alcohol-based markers (Biannual brand)
- Canson marker paper
Tip: Feel free to substitute with whatever you have at home!
How to Draw a Rose for Intermediate Artists in 10 Simple Steps
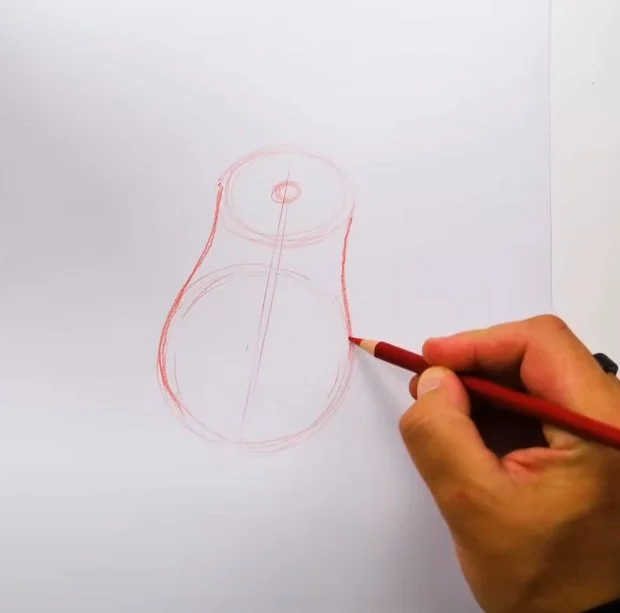
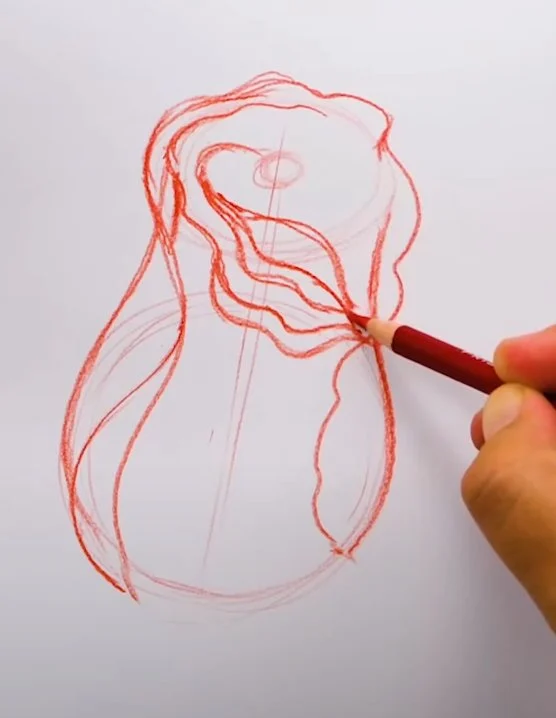
Step 1: Sketch the Basic Structure
Begin by lightly drawing a circle in the center of your paper. This represents the base of the rose. Inside it, draw a tilted oval for the rose’s center. Then, around this center, add a larger oval.
Now connect the outer edges of the ovals to the circle with S-shaped curves. This builds the general three-dimensional shape of the rose.

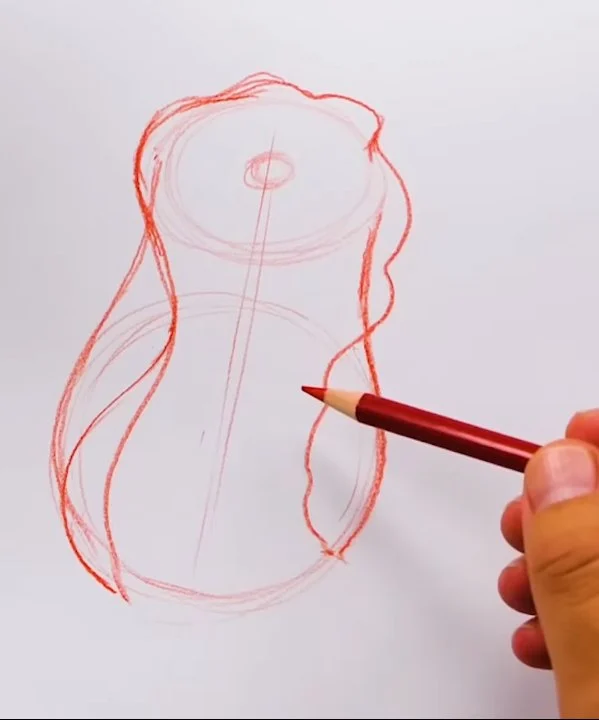
Step 2: Add the First Layer of Petals
Starting from the outer shapes:
- Draw a wavy petal wrapping around the form. Use flowing S-curves to make it look natural.
- Add small ripples and folds in the petal lines to mimic the way real rose petals curl and ripple.
- Create a few more petals around the center, each curving slightly differently to suggest peeling and bending away from the flower’s core.

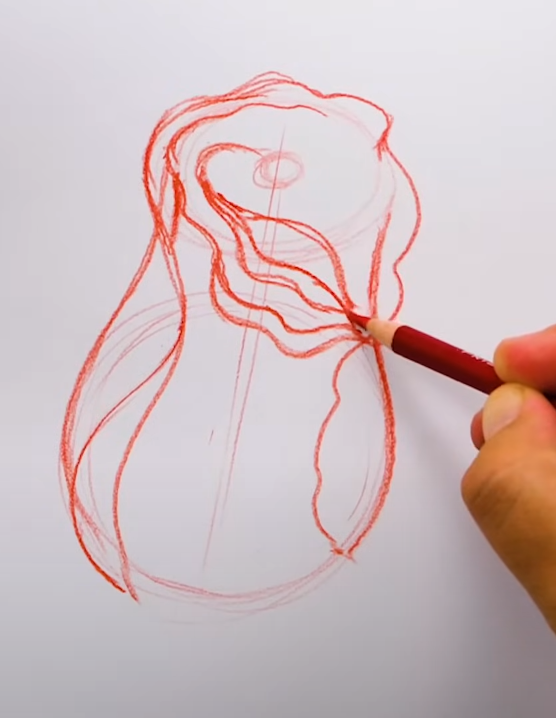
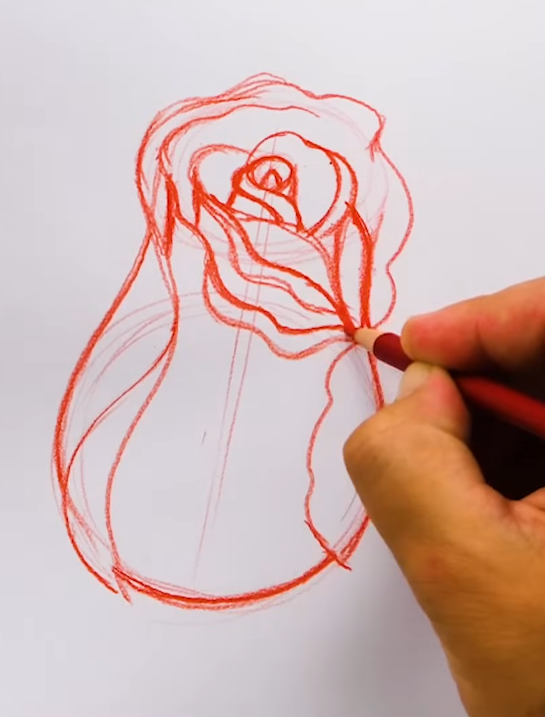
Step 3: Build the Next Layers of Petals
Continue layering petals around the rose:
- Use wavy lines to create petals wrapping around the inner structure.
- Each new petal should slightly overlap the previous ones to enhance the feeling of depth.
- Include small edges or tips of petals curling outward to show the natural unfolding.
Step 4: Draw the Central Petals
Inside the oval center:
- Sketch smaller, tighter petals curled around each other.
- Focus on creating a spiraling effect, where the innermost petals seem to twist and wrap inward.
- Add tiny folds and overlaps to make it feel lush and full.

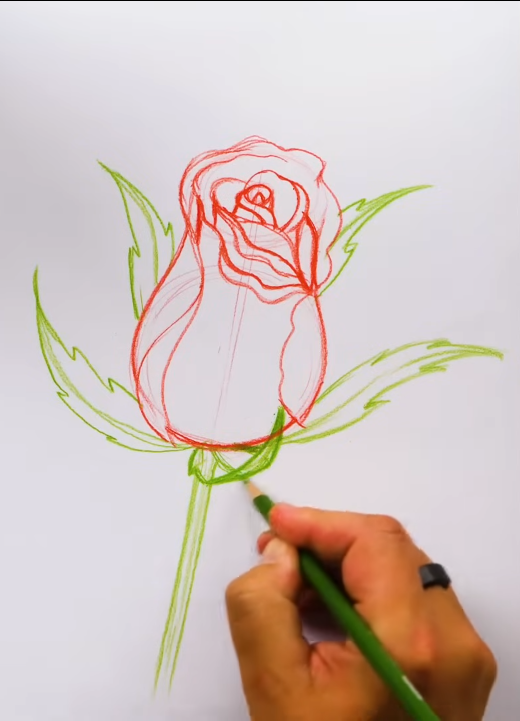
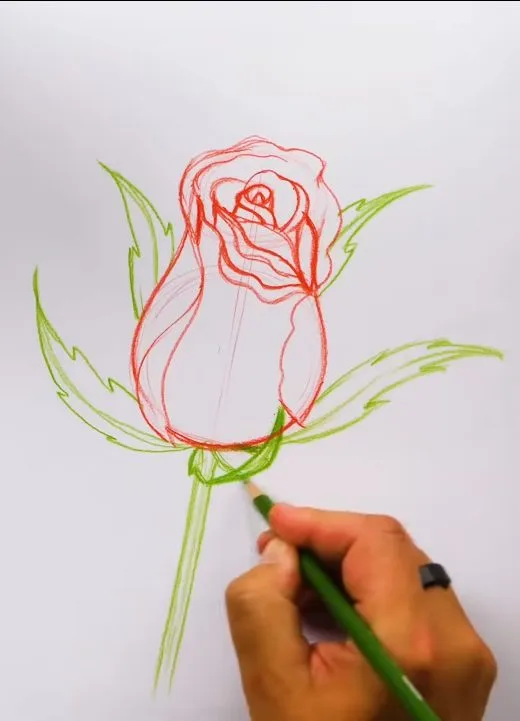
Step 5: Sketch the Stem and Sepals
Switch to a green pencil or continue with your sketch:
- Draw a straight stem coming directly down from the rose’s center.
- Add small pointed leaves (called sepals) around the base where the flower meets the stem.
- Sepals should curve outward and have slight zigzag edges for realism.
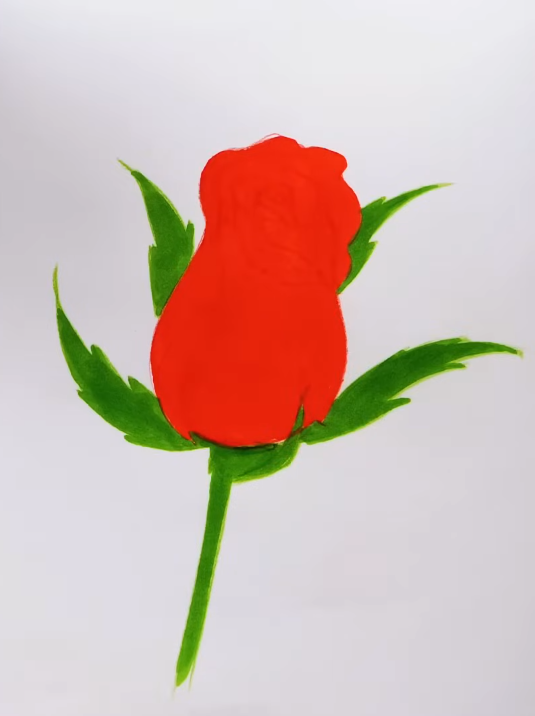
Step 6: Color the Base Layers
Using markers or colored pencils:
- Fill the entire rose with a solid base color (red for petals, green for stem and sepals).
- Keep the coloring even at this stage; you are preparing for later shading.

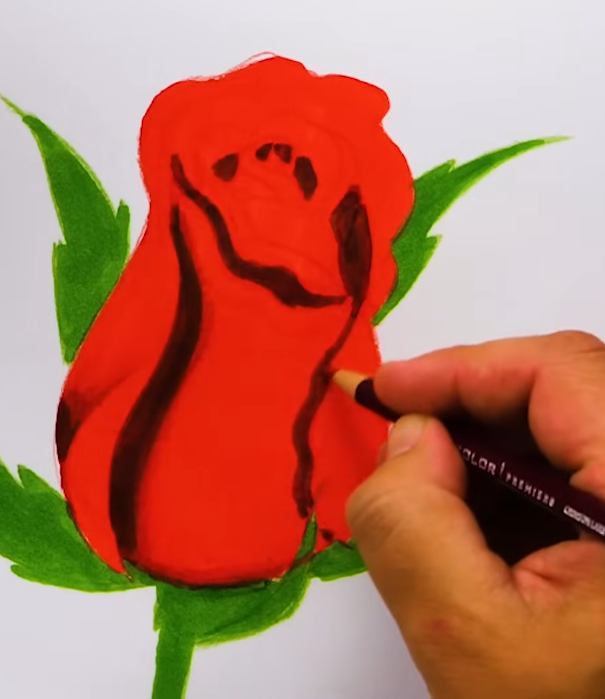
Step 7: Add Shadows
Switch to a darker red marker or pencil:
- Shade the inner parts of each petal where they overlap.
- Focus on blending the shadows softly outward to avoid harsh lines.
- Add deeper shadows underneath overlapping petals and inside the spiral center.

Step 8: Blend and Deepen
Use a dark red or crimson pencil:
- Blend the marker and pencil shading to create smooth transitions.
- Start pressing harder near the shaded areas and lighten the pressure as you move outward to create a natural gradient.

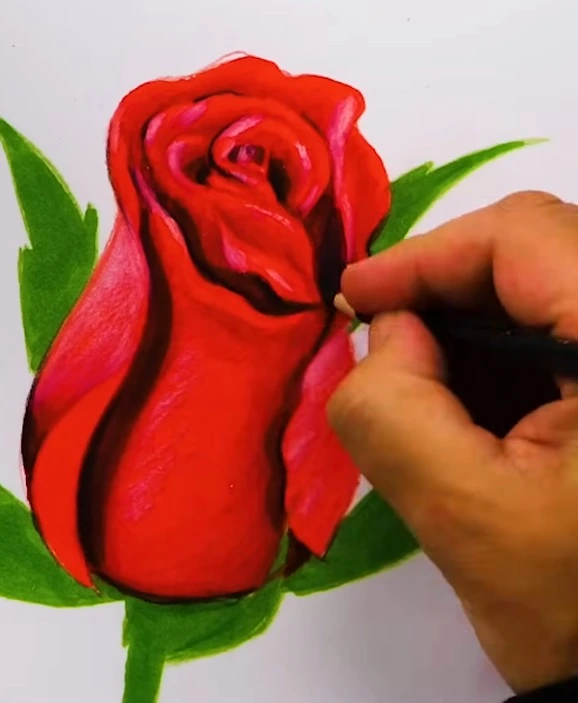
Step 9: Highlight the Petals
With a white colored pencil:
- Gently add highlights along the outer edges and ripples of the petals.
- Apply more pressure where the light hits the petals most, and lighten as you move toward the shaded areas.
- Imagine the light coming from the top left to guide where you place highlights.
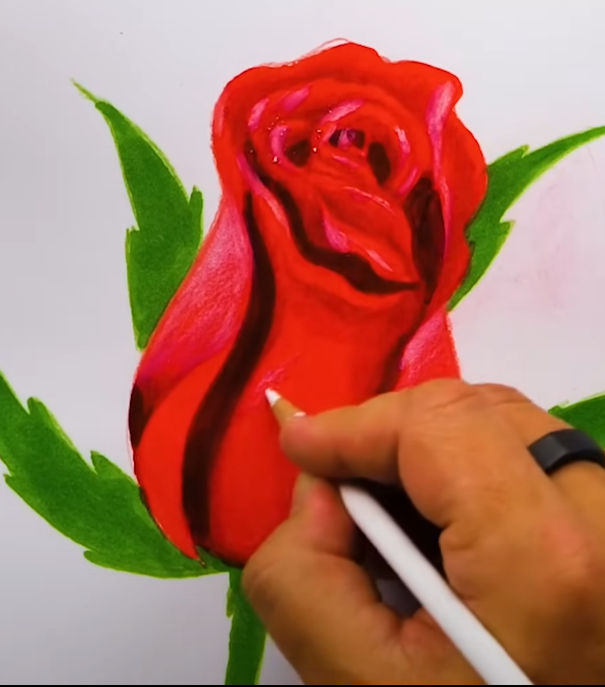

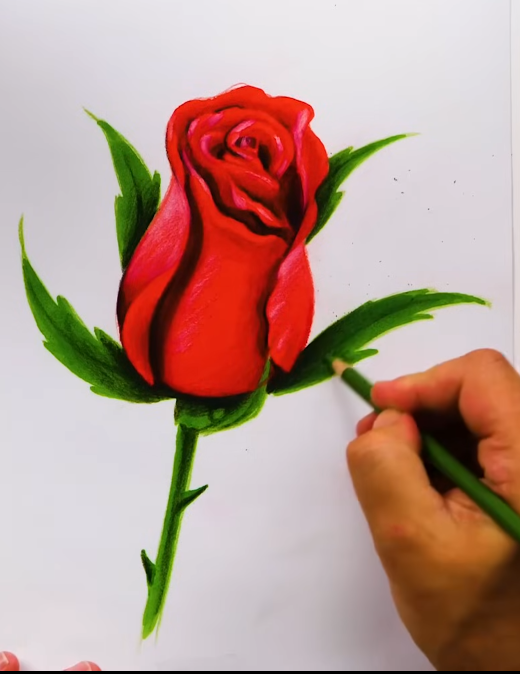
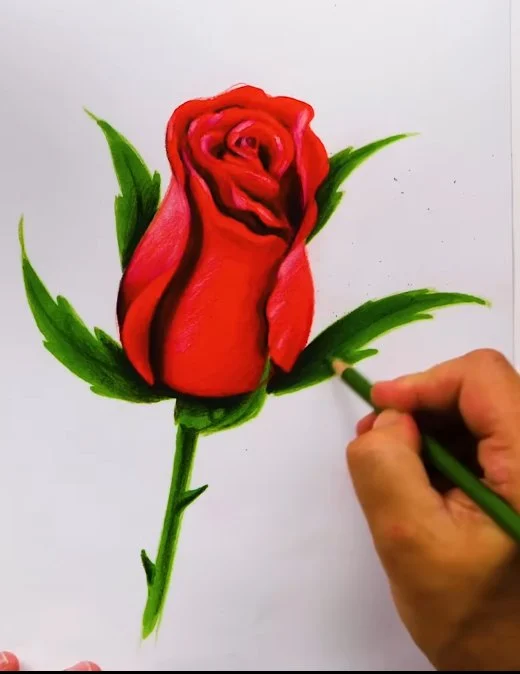
Step 10: Final Touches
- Use a black colored pencil to deepen the darkest shadows where petals meet and where the flower sits on the stem.
- Darken the base of the sepals and the underside of the stem to enhance three-dimensionality.
- Optional: Add tiny thorns along the stem with your green marker for extra realism.
- Finally, softly blend any harsh textures with the original light green or red pencils for a polished finish.
Also don’t be left out on more brainstorming drawing and painting tutorials:
Easy Acrylic Beachscape Painting Tutorial for Beginners plus painting Ideas
5 Essential Steps to Painting Realistic Trees for Stunning Results
A Step-by-step Guide to Painting Water with Acrylics
Conclusion
Congratulations! You’ve completed a beautiful rose drawing. The magic of this tutorial lies in layering basic shapes, adding natural waves to your lines, and gradually building up shadows and highlights. Remember, it is completely okay if your first attempt does not turn out perfect. Save your artwork, revisit it after a month, and you’ll be amazed at your progress with just a little practice!
Frequently Asked Questions
How to draw a rose the easy way?
The easiest way to draw a rose is by starting with simple shapes like circles and ovals. Sketch a small oval for the rose’s center, then draw larger overlapping ovals around it to form the petals. Keep your lines light and use wavy curves to make the petals look natural. From there, you can build layers gradually, adding more detail as you go.
How to draw a beautiful rose with a pencil?
To draw a beautiful rose with a pencil, begin by mapping out the basic shapes with light, gentle strokes. Focus on layering the petals with soft, wavy lines and create depth by overlapping them. Once your structure is complete, use shading techniques like blending and adding highlights to make the rose appear realistic and three-dimensional.
How to draw a flower?
Drawing a flower starts with sketching the center and then adding simple petal shapes around it. For basic flowers like daisies or hibiscus, you can use wide, rounded petals that radiate outward from the center. Light pencil strokes help you easily adjust as you add details. You can enhance your drawing by adding textures, leaves, and shading for a more lively effect.
How to draw a cute girl for kids?
When drawing a cute girl for kids, simplicity and big features are key. Start with a large round head, add big expressive eyes, and a small smiling mouth. Keep the body small and simple with basic shapes like circles for hands and ovals for feet. Fun details like pigtails, bows, or simple outfits make the drawing even more adorable and engaging for young artists.